FAQ 1:
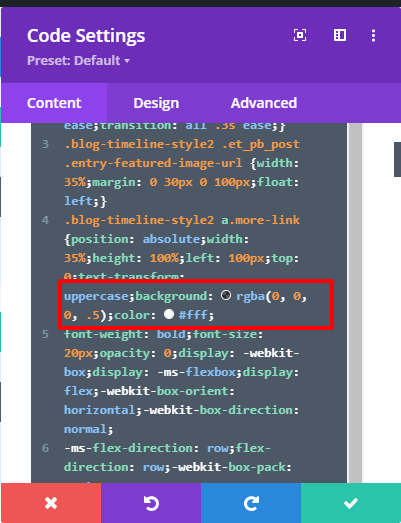
How To Change or Manage Color For Button (Text, Background, Hover) and CSS in Blog:
(Note: button text color = color , button background color = background)
How To Change Color in Blog:
For Blog List Page:
Go to Code Module -> Line No: 9 (.blog_list_style_1 .et_pb_post a.more-link) -> color: #Enter your color code;
Go to Code Module -> Line No: 9 (.blog_list_style_1 .et_pb_post a.more-link) -> background: #Enter your color code;
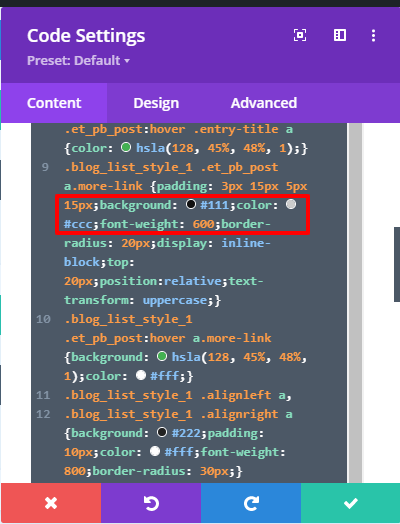
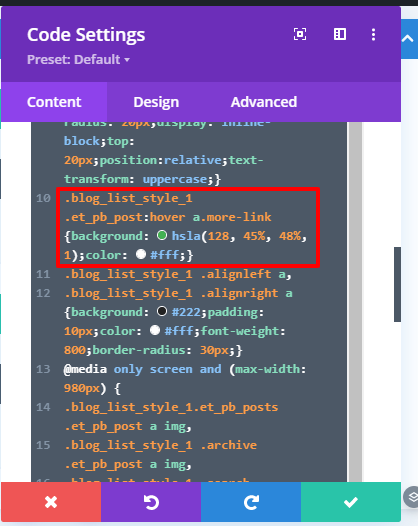
Go to Code Module -> Line No: 10 (.blog_list_style_1 .et_pb_post:hover a.more-link) -> color: #Enter your color code;
Go to Code Module -> Line No: 10 (.blog_list_style_1 .et_pb_post:hover a.more-link) -> background: #Enter your color code;
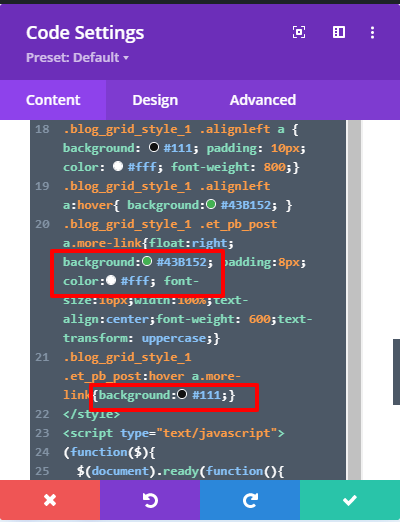
For Blog Grid V1 Page:
Go to Code Module -> Line No: 21
For Blog Grid V2 Page:
Go to Code Module -> Line No: 11
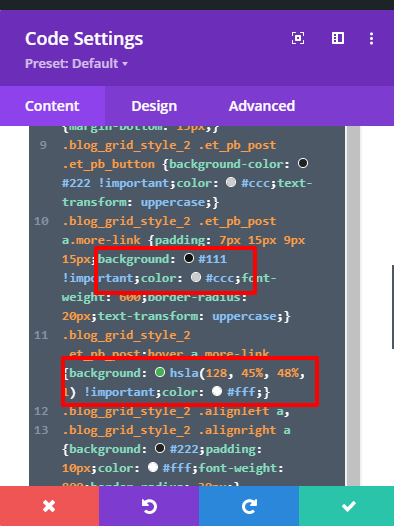
For Blog Fullwidth V1 Page:
Go to Code Module -> Line No: 16
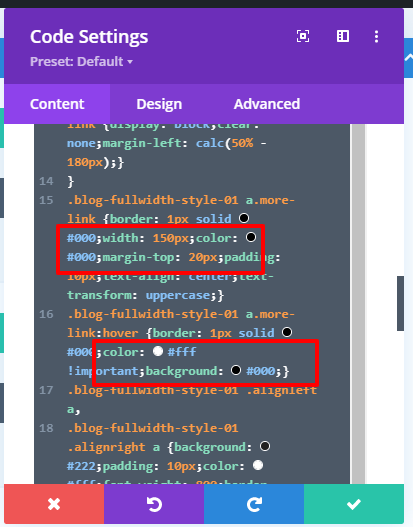
For Blog Fullwidth V2 Page:
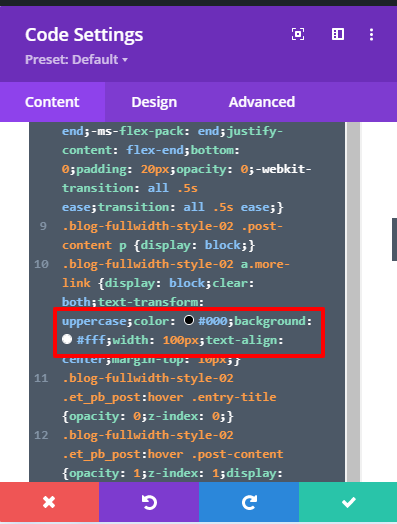
For Blog Timeline V1 Page:
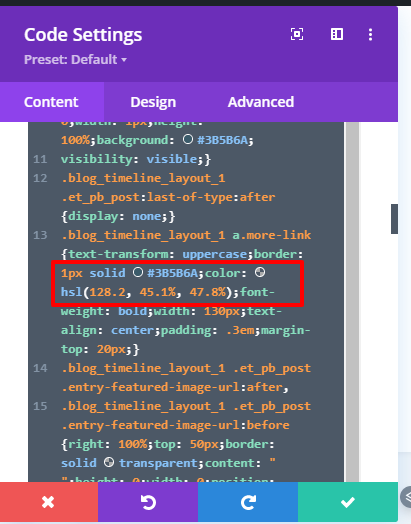
For Blog Timeline V2 Page:
FAQ 2:
A. How To Change Read More Text in Blog:
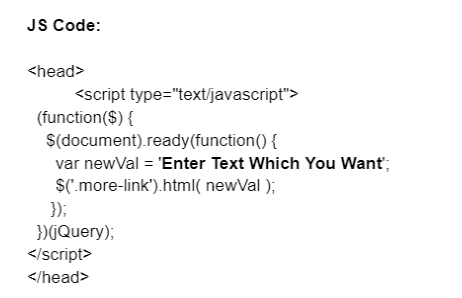
You can use any text in place of ” Enter Text Which You Want” in the code above to reflect same on your button.
or
For More Information Can Click Tutorial Here & Refer Section For Same
B. How Can You Add Background Colour Around The Read More Buttons ?
It can be done from Divi Setting ie Go To Blog Module – Click On Gear Icon – > Visit Advanced Tab


Step 3:
You need add below code:
Code Is In Inverted Coma :
“
background: #e51b22;
padding: 7px 21px;
margin-top: 16px;
margin-bottom: 10px;
display: inline-block;
“

Or
Please check below Tutorial
Click Here To Check Tutorial From Divi.Help For same
Or
Click Here To Check Tutorial From peeayecreative For same
FAQ 3:
In Blog Full Width V2 – Some Of The Blog Posts Moved Above or Below From The Position & Not Displaying Like Demo ?
Just change height to fix issue and ideally default height is ‘ 222 px ‘
.blog-fullwidth-style-02 .et_pb_post {
        position: relative;
        width: 25%;
        float: left;
        margin-bottom: 0;
        cursor: default;
        height: 222px;
}
FAQ 4:
There is Issue with the ‘ Blog Version ’ content or images when updated it to latest version of Divi / WordPress for example ‘ Images / Blog Section ‘ acts weirdly on load or hover ?
https://wordpress.org/plugins/ssl-insecure-content-fixer/
FAQ 5:
For ‘ Masonry Blog Version ‘ on ‘ Hover ‘ blocks disappears or hovering effect have issue ?
.masonary-style1 .et_pb_post {
backface-visibility: hidden;
}

.masonary-style1 .et_pb_post a img {
    width: 98%;
    margin-left: 1%;
    margin-top:1%;
}
You can write this in Custom CSS in Page Settings or Divi Theme Options.
FAQ 6:
For ‘ Masonary ‘ version there is white space at ‘ Right ‘ when ‘ Json ‘ is imported or blank space is visible on the page after importing.
‘ Import Dummy Blog Posts ‘ as mentioned in the ‘ installation guide ‘ to fix the issue.
FAQ 7:
After applying JSON it is still showing error and JSON is not importing properly?
If any of the plugin is installed you need do as below:
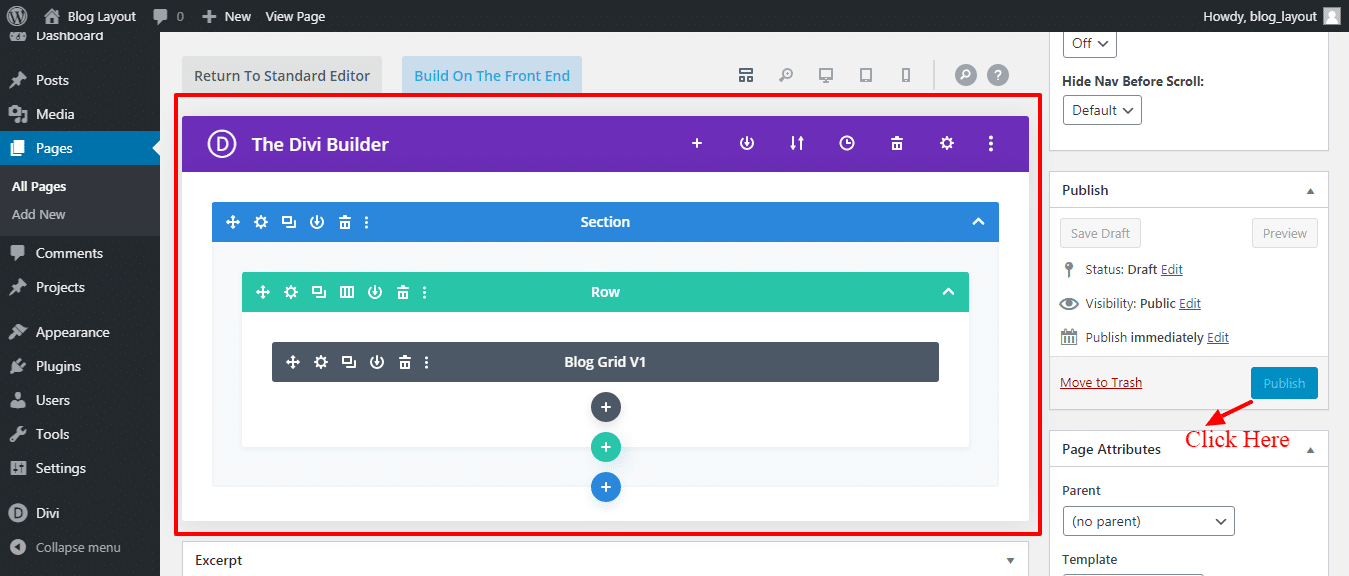
A. Disable security plugin and try import ‘ JSON ‘ again and verify when import is completed it show ‘ Layout Sections ‘ in back-end like in screenshot
FAQ 8 :
How To Manage Blog Slider Version Elements ?
Answer :
Kindly refer below documentation or tutorial for more information :
FAQ 9 :
How To Make Your WordPress Website Multi-Lingual ?
Answer :
Kindly refer documentation & suggestion by elegant themes below:
FAQ 10 :
How To Manage Button Colour(Background, Hover) & Hover Colour For Post Title In Blog Styles ?
Answer :
In code module you will find CSS to manage Blog Style
Go to Divi Builder Page Of Specific Version – > Edit Divi Builder – > Code Module – >
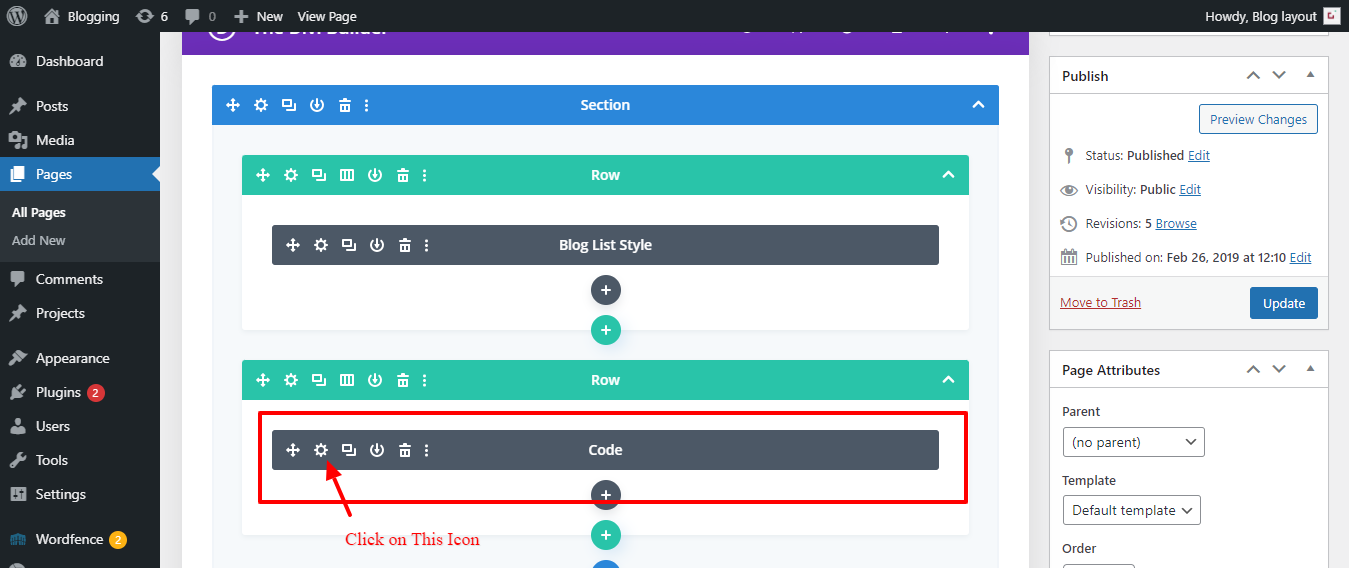
Here we are taking example of ‘ Blog List Style ‘ likewise can manage other styles in similar manner
Once you are in the backend find ‘ Blog List Code ‘ ie under ‘ **** Code Module ******
In our case that is ” Line No 9 ::
For button background color:- Go to Css Code -> /***Blog List V1***/ -> Line No: 9 (.blog_list_style_1 .et_pb_post a.more-link) -> background: #Enter your color code;
For button text hover color:– Go to Css Code -> /***Blog List V1***/ -> Line No: 10 (.blog_list_style_1 .et_pb_post:hover a.more-link) -> color: #Enter your color code;
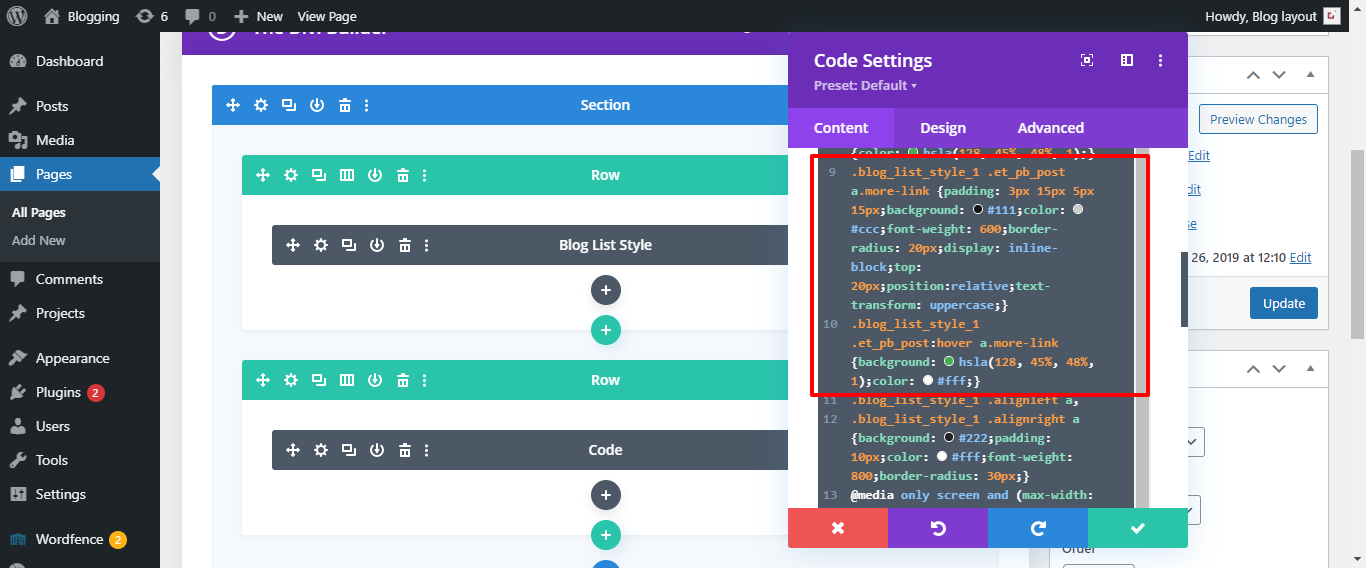
Save it & check after clearing cache
Answer :
Load Specific Version ‘ Divi Builder ‘ back-end – > In code module you will find CSS to manage Blog Style
Step 1:
Go to Divi Builder Page Of Specific Version – > Edit Divi Builder – > Code Module – >

Line number 8
.blog_list_style_1 .et_pb_post:hover .entry-title a {color: hsla(128, 45%, 48%, 1);}
Step 3:
Change ” {color: hsla(128, 45%, 48%, 1);} ” to one you need and save
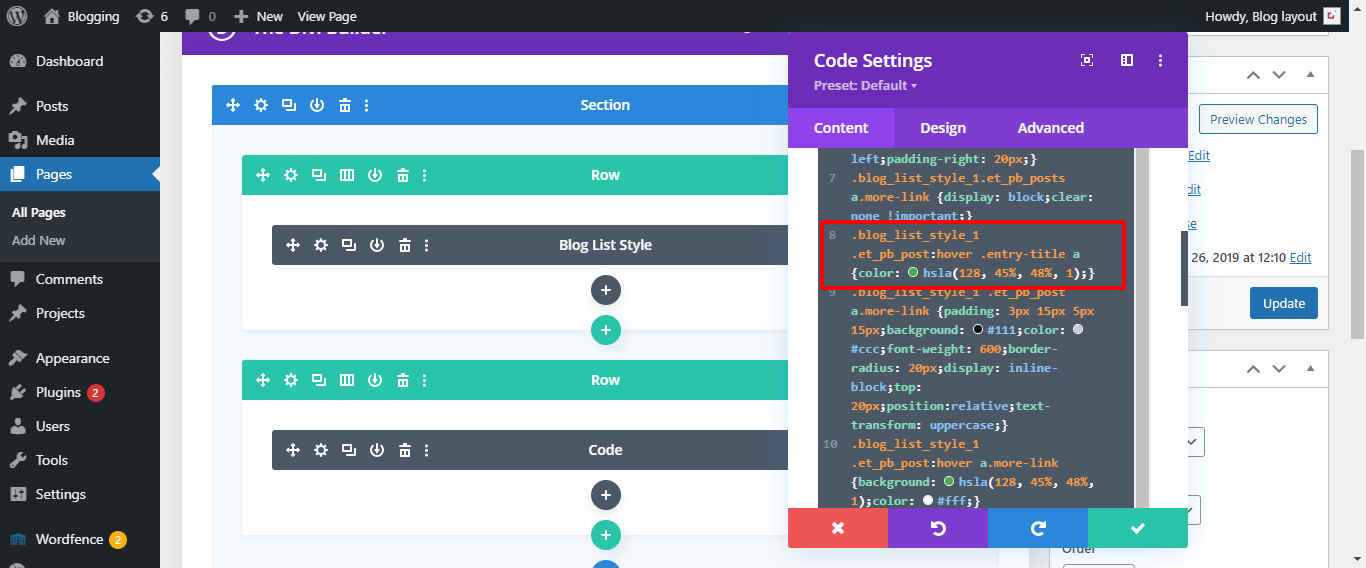
.blog_list_style_1 .et_pb_post:hover .entry-title a {color: #f26700 ;}
Here code can be one you need like here ‘ Color Code Replaced ‘ is : #f26700
Step 4 :
Save it
Step 5 :
Clear cache
Note:
1. CSS code ‘ line no ‘ could vary at your end and you need locate the specific ‘ line ‘ at your end tp make changes and save it
2 . If still problem persist there might be some conflict issue or other issue that is not reflecting your changes at front-end and can contact developer to investigate.
FAQ 11 : FOR LAYOUTS IN GENERAL:
External Javascript Does Not Work After Recent ‘ Divi / Wordress ‘ Update or There Is Issue With Some Of The Web Pages ie When Page Load It’s ‘ Content / Images ‘ Get Distorted or Broke ?
Sometime this issue occur depending upon the various factor like if site is SSL activated, Plugin Conflict Like Wordfence , and JS issue.
You can follow below steps to get it resolved : –
Step 1 : Can install content fixer plugin below and activate to fix insecure content on the site – Click Here To Download Plugin
Step 2 : Try de-activating ‘ Cache / Security ‘ plugin like W3 Total Cache or Wordfence
Step 3 : After the Divi latest update they have added new feature that is related performance and can be found
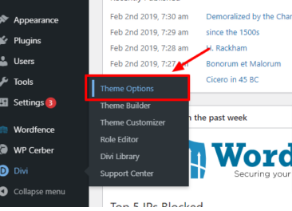
1: Under Divi – > Theme Options – > General Tab – > Click Performance Tab
2. Try disable tab A. Enqueue jQuery Compatibility Script B. Defer Additional Third Party Scripts C. Defer jQuery & jQuery Migrate
Save the changes

FAQ 12 :
How To Set HomePage Under Menu Option & Set Menu Structure In Divi ?
A. How To Set HomePage Under Menu Option :
Step 1:
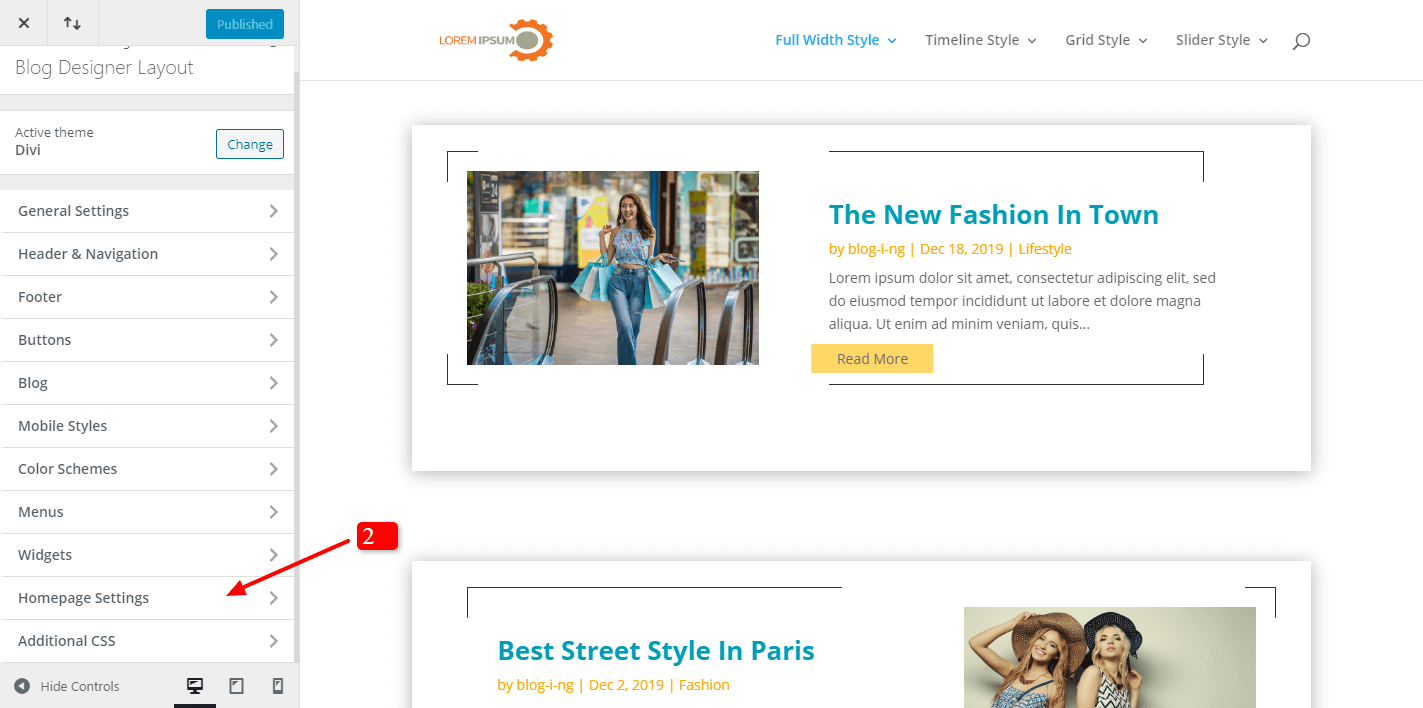
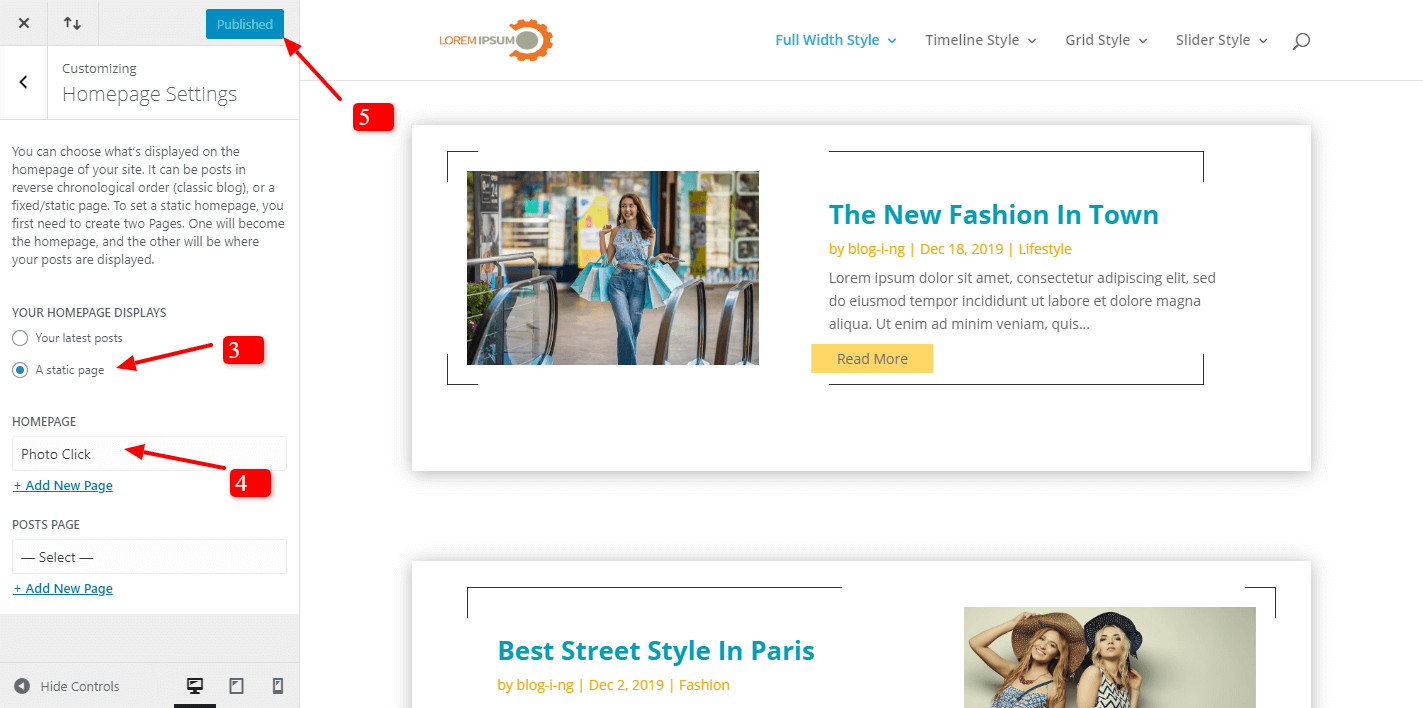
Go To – > Appearance – Customize -> Homepage Setting
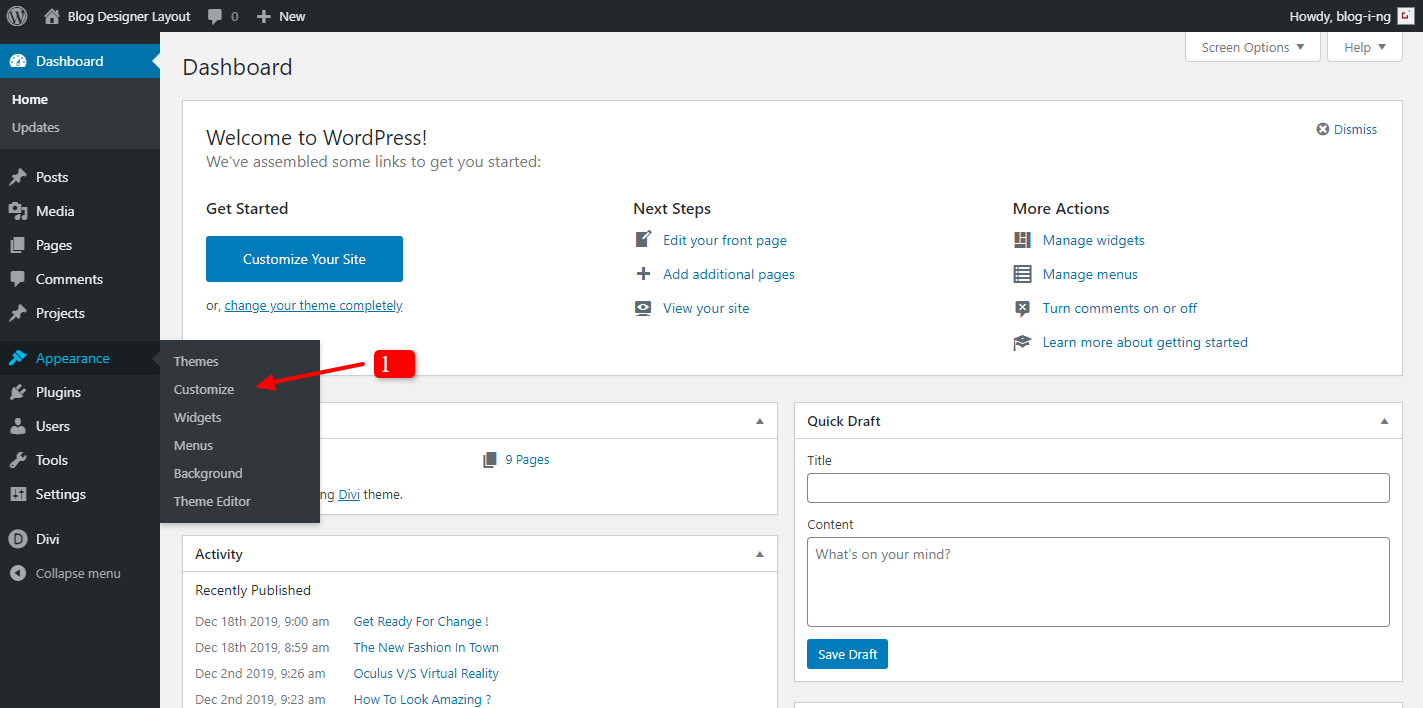
Select Static Page -> Select Page That You Need Set As HomePage (like in example it is photo click) -> Publish – > Check Front-End For Changes
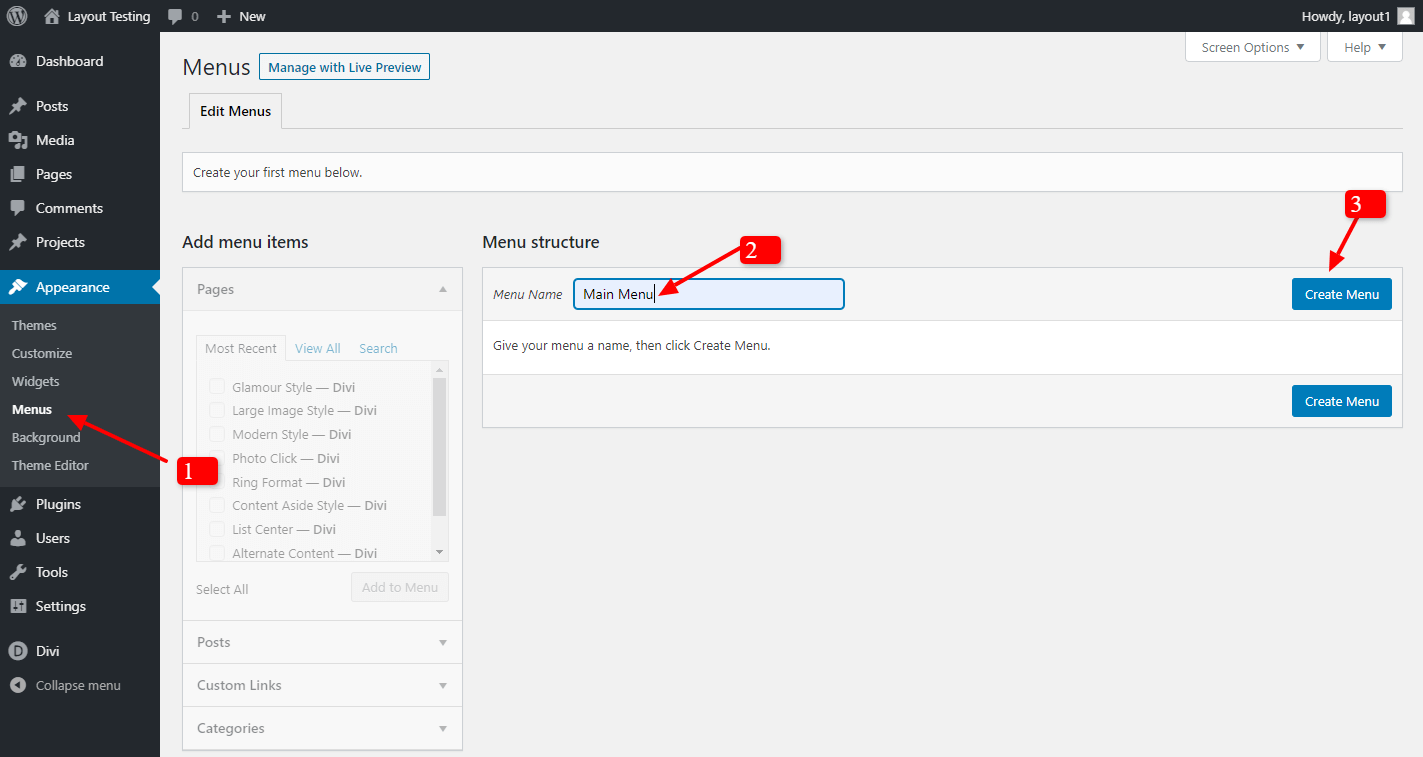
Step1:
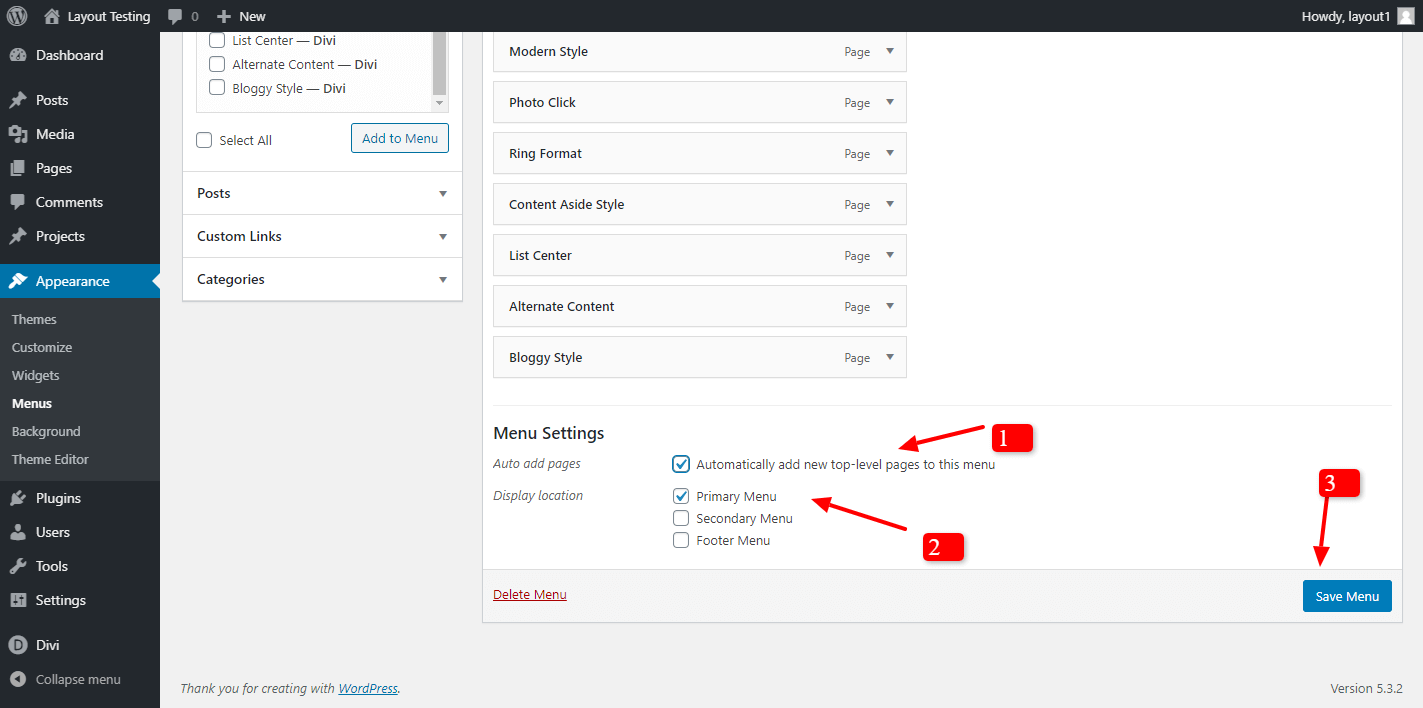
Go To Appearance -> Menu – >Select Menu Name (usually as ‘Main Menu ) – > Create Menu
Select All Page You Need Add In Menu
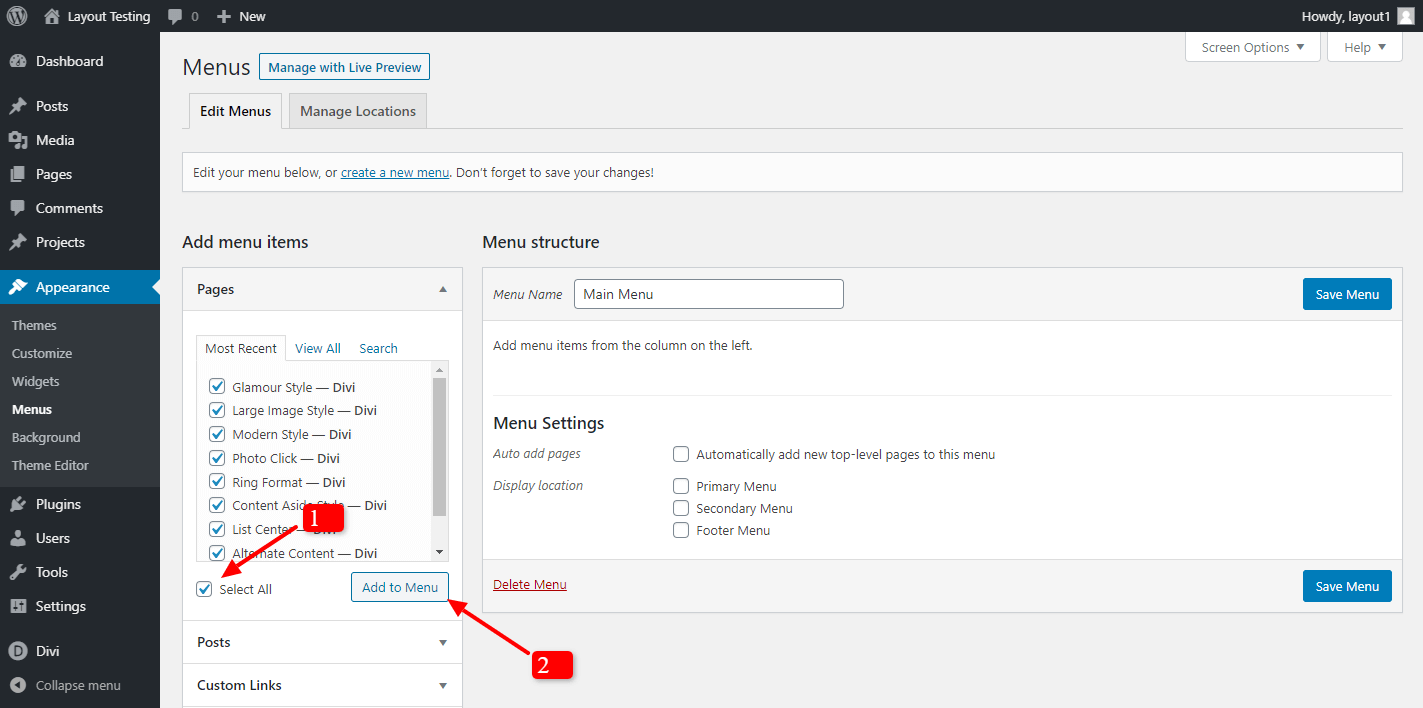
Under Menu setting Tick Mark 2 Check Boxes
-> Automatically add new top-level pages to this menu
-> Select Menu Option (Usually It Is ‘ Primary Menu ‘)
